Wanna go ahead with top marketplace of the USA? Start selling on Walmart! Globalise your brand. Increase your buyers. Boost up your sales. Just install Walmart Marketplace Integration App and be the part of the giant online selling platform.
How can I disable the free shipping from my products on Walmart ?
If you want to disable or remove free shipping from your products then to Settings. Under the “Product Setting”, you’ll see an option "Remove Free Shipping From all Products". Set this field to YES and the free shipping will be disabled.
How much time will it take to make product publish on Walmart.com ?
When you have uploaded the products, the feed will be generated. If all the information you provided is correct from your side then normally it takes approximately 20 minutes to process the feed.
When a customer places an order from Shopify Store, will the updated inventory be reflected on Walmart.com and app ?
Yes, when a customer places an order from Shopify Store, then the updated inventory will be reflected on our app as well as on Walmart.com since we provide real-time inventory synchronization.
Why the products are Unpublished and not showing on Walmart.com ?
Walmart team has some parameters on which they analyse the products of all the merchants. The reasons for the unpublished products can be due to following:
1. When your product price is high in comparison with the competitor’s price, they unpublish the product.
2. When the product price on “Walmart” is different compared to other marketplace, they unpublish the product.
3. If you use keywords like FREE, DISCOUNT, SALE, etc they unpublish the product.
My products status is “Item Processing” from many days, how much time will take to Publish the products on Walmart ?
Walmart takes approx 15 to 20 minutes to process product feed. The products under "Item Processing" means your product feed is successfully submitted to Walmart. All you need to do is to update the product status by clicking on "Get Product Status" in the Manage Products section.
I have completed the configuration set up even then my products are not getting published. They are under Stage state and not uploaded. What is the reason behind this ?
If you have completed the configuration set up and even then your products are not published on Walmart, in that case check your “Check List” in your “Walmart Seller Centre”. It happens when you have not completed the check list for example: not performed test order scenario.
I want to set the special price or offer price of my product on Walmart.com but it is displaying my offer price as actual price. How can I show both the price i.e, Offer price and actual price on Walmart ?
While setting up the promotional price or offer price of your product you have to follow these steps:
1. Go to the Manage product section.
2. Then click on edit button of that product for which you have to set the offer price.
3. Then click on “Add promotional Price”
From there you can set the promotional price to that particular product SKU. Doing so will display both the offer price and the actual price of the product for the particular time period that you select.
I have more than 100 products but only a few products are imported to your app. Why ?
On our app only those products are imported that have Product Type. This information is mandatory to import the products on our app. It is recommended to provide Product Type to the products that you want to publish on Walmart.
Can I edit the value of SKU of my product ?
Yes, we provide the functionality of “SKU Override”. If you want to change the SKU of any particular product then all you have to do is to go to the edit product and set the value of “SKU OVERRIDE” = YES and then upload that product.
Can I delete any of my product from Walmart ?
Yes, you can delete a product. There is a “Delete” button at the bottom of Edit product. Click on delete button a dialogue box will appear asking “Are you sure. Want to delete product from Walmart?” if you will select it and click on confirm then the product will be deleted from the Walmart.com.
I have changed the image of my products on my Shopify store. How will it be reflected on your app and on Walmart.com ?
If you have changed the image of your products or made any change to price, inventory, title, barcode, etc. Then all you have to do is to click on “Sync Store Product” then a dialogue box will appear containing list of fields to be Sync with Shopify. From there you can select the fields that you want to Sync from shopify store. Then click on Sync. After this all the changes that are made on Shopify store will be reflected on our app and after uploading the products the changes will be reflected on Walmart.com.
Many of my products are under “Not uploaded” stage. When I upload then it shows “Products successfully uploaded” but when I update feed all the products are shown under “Item failed”. Why is it so ?
When your products are shown under “Item Failed” it may be because you have not mapped the attributes of Shopify store to Walmart attributes. When your products fall under “Item failed” you can click on view option of that particular feed. Doing so will let you know the problem in that product.
I have many products and all having the same tax code. How can I set the universal tax code ?
If you want to set the common tax code to all of your product then, go to setting there you will find “Product Settings” within it you can see Product tax code click here . By clicking on “click here” you can get the tax code and set it in the text field. Then click on “save” button. The text code will be set to all of the products.
I am getting the emails of every order that is acknowledged. But I don’t want any email regarding acknowledging orders. From where do I stop it ?
If you want to stop emails notification of acknowledged orders then you have to go to Setting there you will find “Email Subscription Setting” under this you have “Order Fetch Mail“, unchecked this field and then click on “Save” button on top of the page. Now you will not get any email regarding order acknowledgement.
I changed the inventory of one of my product nearly an hour ago on Shopify store from 5 to 9. Although the change showed up immediately in your app, but Walmart still shows 5.
The changes once synced to our app are immediately reflected on walmart but if in any case it is not reflected then you can select that product and upload it again. The changes will be reflected on Walmart.com.
I use shipstation to pull in Walmart.com orders, but since it also pulls in Shopify orders, they show up twice. How do I stop the Walmart orders from going to Shopify? I’d like to stop syncing my walmart orders to Shopify.
If you want to stop your Walmart.com orders from going to Shopify store then follow these steps:
1. Go to “Setting” there you can see “Walmart Orders”.
2. You can set “NO” to “Set ‘No’ if you don’t want to sync order(s) in shopify store“
3. Then click on “Save” button on top of page.
Now your orders will not sync to Shopify store. And you can easily manage your orders directly from Shipstation.
What are the Products ID’s (Product Identifiers) that are accepted by the Walmart.com ?
Walmart accepts following Product Identifiers:
1. GTIN (14 digits)
2. UPC (12 digits)
3. EAN (13 digits)
4. ISBN (10 or 13 digits)
5. ISSN (8 digits)
Requirements and how to upload product on Walmart.com ?
To upload your products on Walmart.com, you will be required to follow the below steps:
1. Category Mapping : You need to map categories of all the product types as if the Category is not Mapped, the Product will not be displayed on the app.
2. Attribute Mapping : In case of product variants, it is mandatory to map the “Attributes”.
3. Barcode : Make sure that your product have a barcode. Add barcodes to your product if the products do not have a barcode. You can add barcode from shopify store and then sync it to app, or add the barcode to individual product from edit product option.
4. Tax Codes : All the product must have valid taxcode. If your products do not have the taxcode then you can add taxcode from the “Edit” option of individual product.
5. Select Product and Upload : Select the product that you want to publish or upload on Walmart.ca. Then select “Upload Product” from the drop down list then click on “SUBMIT” button. After your products Successfully Submitted to Walmart proceed to next step.
6. Walmart Feed Update : Click on "Products" from the menu, then click on “Walmart Feeds”. Update the recent feed that you had send to the Walmart.ca. After Updating the feed status you will be able to know whether your feed has been received, processed or in-process on Walmart’s end.
7. Product Status: Once your feed status is "Processed", you will be able to see the number of products that are successfully uploaded or published on Walmart.ca. Go to “Manage Product”, click on “Get Product Status” this will change your product status from "Not Uploaded" to "Published" if the product is uploaded on Walmart.
My Walmart orders are not fetching in your app. Why it this so ?
The walmart orders are not getting fetched on the app, this may happen because you are using any other shipping services. We recommend you to fully integrate all the services with our app and disable all other shipping services.
What is Partial Order? How does it works ?
Partial Order functionality helps you in easier order management.
=> If you set “YES” to partial order from the setting it will automatically cancel those orders that get failed due to any reason (inventory not exist or the SKU not exist, etc).
=> And if you get an order for more than one SKU then it will acknowledge and create an order for that item line that does not have an error but cancels the order for that item line that has an error.How can I stop the syncing of my product price on Walmart, as I want a different price on Walmart and on different on my shop ?
If you want to stop the syncing of product information (price, inventory, title, SKU, etc) then, in that case, you can simply go to the App settings. There you will find “Auto Product Sync” in this you can de-select those fields that you do not want to sync.
What should be the length of product title and description for best readability and SEO results ?
1. Title or product name should be 50-75 characters in length for best readability and SEO results.
2. Description should be a paragraph of 150 words or more. The longer, the better!
How to retrieve Walmart API credentials ?
To retrieve “Walmart” API credentials you must go through the following steps:
1. Open the “Walmart Seller Account”.
2. Click on the “Settings” icon.
3. Under the “Settings” icon, click on “Consumer IDs & Private Keys”.
4. When the page redirects, click on “Copy” button under the “Consumer ID” section and click on “Regenerate Key” button under the “Private Key” section.
5. Paste these credentials in step-2 i.e; API Configuration of the app.
How to edit my products on the Walmart integration app ?
To edit any information of any product, you must go through the following steps:
1. Click on “Manage Products” under the “Products” section of the Navigation bar of the dashboard.
2. Click on
icon in “Action” column. Before making changes in the product information, kindly disable the syncing of that particular information from the “App Settings”.
3. Make the required changes and then click the “Save” button.
 How to verify & claim your domain on GMC through the app?
- Step 1: Log in to your GMC account
In the Google Merchant Center dashboard, click on the Settings icon and go to Business Information. On the next page, click the Website tab and enter your website URL. Click Save. - Step 2: Add the HTML to verify your Shopify website
Choose I have access to my server, click Add an HTML tag to my homepage, and copy the meta tag. - Step 3: Add the meta tag to your Shopify store
Log in to your Shopify account, and navigate to Online Store > Themes. Click the Actions dropdown, and choose Edit Code.
Go to {/} theme.liquid and you need to paste the meta tag. The next thing you need to do is to click ctrl + F on your keyboard, then type or paste in the search bar. Click Enter.
Next, paste the meta tag you’ve copied BEFORE this header. Then, click Save. - Step 4: Verify your URL
Go back to your Google Merchant Center account and click Verify URL. - Step 5: Claim URL
Simply click the CLAIM URL button to claim your Shopify website URL.
What are the different programs in Google Merchant Center and how to enable them?There are multiple programs in GMC, but some of them are the most important. Before we talk about all the different programs, let us show you where you can find them.
In the left-hand menu, click on Growth, and choose Manage programs. This gives you an overview of all the programs that are available in your merchant center account.
- Google Shopping Ads
- Buy on Google
- Free Listings
- Dynamic remarketing
- Local Inventory Ads
- Promotions
- Product Ratings
You can find the option to enable all of these programs. Complete the steps or the parameters in each of the programs in order to activate them.
How to set up shipping settings in GMC?- Go to Gear in the top right corner, and select Shipping and Returns under Tools.
- Select +New shipping service.
- Name your shipping service and select the country and currency you want the shipping service to be applied to
- Next, you’ll have to enter delivery times. You can either choose to show custom delivery times or set a range of delivery times.
- Setting a range of delivery times involves a few more steps:
- Order cutoff time: It is the time of day by when the orders must be placed in order to be processed that same day.
- Handling time: It is the time between the order being placed and put out for delivery during business days. You can enter 0-0 if you offer same-day shipping.
- Transit time: It is the time it takes for the carrier to deliver the order to the customer.
- Put in your shipping costs
- After you’ve got all of your shipping settings in place, you can test if prices are accurate by going to the products page in Google Merchant Center.
- Select a product, and when you scroll down a bit, you’ll see the price.
How to set up tax settings in GMC?- Sign in to your Merchant Center account
- In settings under the Tools menu, select Sales tax
- Click on the Tax Settings tab
- When you click Advanced settings, the list of all states will appear.
For each state where you’d like to charge sales tax:- Click the toggle to select the state.
- For “Tax rate,” choose either:
- “Google-determined sales tax” (Automatic setup) to let Google estimate the rate based on the location of the customer, or
- “Custom sales tax” (Manual setup) to enter a specific rate to charge for the entire state.
- If you charge tax on shipping, select Tax on shipping.
- Click Save at the bottom of the page once you’ve configured taxes for each of the selected states.
What should I do if my merchant center is suspended?The most common reasons that Google suspends a Merchant Center Account at the account level are:
- Having multiple store sites
- Drop-shipping without additional value
- Using a virtual office or PO Box
The most common reason why Google suspends a product is a misrepresentation of self or product. Reasons for this may include
- The omission of relevant information
- Unavailable promotions
- Untrustworthy promotions
Some best practices mentioned below to help you with policy violations and account suspensions:
- Add the below pages to your website:
- Policy Pages:
- Privacy Policy
- Billing Terms and Conditions
- Secure Checkout Page
- FAQs
- Shipping Policy
- Terms of Services
- Other pages:
- Contact Us (Show Contact Address, Email, Phone number, contact us form)
- About Us page (Show company details, aims, and objectives, why should a customer choose you, year of establishment, and email)
- Product landing pages:
Do not copy product images, and content like titles or descriptions from any other source. Show your name as a Brand name.
- Make sure the check-out process is secure and safe:
- Show all the payment methods in the footer of the check-out page. Make sure that the shipping charges and taxes are the same as mentioned on the policy pages.
- Google Merchant center changes:
- Create a Shipping and Tax setting
- Verify your business information and phone number
- The website should be verified and claimed
- Pricing and fake promotions:
- Do not use any compared prices if they are not real especially for every single product if you are promoting a deal or a coupon code, make sure it’s working properly.
Merchant Center errors & fixing them
How to Fix “Missing Value [Age Group]” Error Using the Bulk Edit Feature?- To fix the Missing Value [Age Group] Error, you can add it in either the Default profile or the Custom profile of the application under Category-wise configuration → Age group.
- After adding, you will have to re-upload the products to your google merchant center using either one of the profiles.
How to fix the “Missing Value [Shipping]” Error of Google Merchant Center?- You need to first check for which country the missing value shipping error is showing. Accordingly, create and add the shipping service value in the shipping setting on which you are charging for that particular country. 𝗢𝗿,
- You may also sync shipping from the application using one click. Follow the below steps:Go to the Merchant Center section in Application → Settings → Click on 𝗦𝘁𝗮𝗿𝘁 𝗦𝘆𝗻𝗰𝗶𝗻𝗴 under the Shipping section
How to fix the “Missing Value [Tax]” Error of Google Merchant Center?- You need to check if there is sales tax created and enabled in your merchant center account or not. If not, you may go to your Google merchant center account → Settings → Sales tax → create your tax settings. This option is valid only for the US. Or,
- You may also sync tax from the application using one click. Follow the below steps: Go to the Merchant Center section in Application → Settings → Click on Start Syncing under the Tax Section
How to Fix “Missing Value [Color]” Error using Bulk Edit Feature of Feed For Google Shopping App?- To fix the Missing Value [Color] Error, you can create a custom profile using the Custom profile section of the application and map the attribute Color in the attribute list.
- After adding, you will have to re-upload the products to your google merchant center using your Custom profile
How to Fix “Missing Value [Gender]” Error Using the Bulk Edit Feature?- To fix the Missing Value [Gender]” Error, you can add it in either the Default profile or Custom profile of the application under Category-wise configuration → Gender.
- After adding, you will have to re-upload the products to your google merchant center using either one of the profiles.
How to Fix “Missing Value [Size]” Error of Google Merchant Center?- To fix the Missing Value [Size] Error, you can create a custom profile using the Custom profile section of the application and map the attribute Size in the attribute list.
- After adding, you will have to re-upload the products to your google merchant center using your Custom profile
How to fix “Missing Value [GTIN]” Error of Google Merchant Center?There are two ways to fix the error:
- Add the valid GTIN in the products and upload them. GTIN refers to barcodes, UPC, or any other globally acceptable unique identifier. 𝗢𝗥,
- Create a custom profile from the app. And do not map the GTIN attribute with barcodes. Once the custom profile is created, upload the custom profile.
How to Fix “Invalid Value [GTIN]” Error of Google Merchant Center?There are two ways to fix the error:
- Add the valid GTIN in the products and upload them. GTIN refers to barcodes, UPC, or any other globally acceptable unique identifier. 𝗢𝗥
- Create a custom profile from the app. And do not map the GTIN attribute with barcodes. Once the custom profile is created, upload the custom profile.
How to fix “Unavailable Mobile and Desktop Landing Page Error” of Google Merchant Center?How do you resolve invalid Destination (included/excluded) errors in the products?To remove this error from the Google Merchant Center, you need to make sure you upload products feed for programs that you have enabled in the merchant center.
If you upload product feed for any program that is not enabled in the merchant center, then it will show Invalid Destination [Included Destination], and vice versa.
- Step 1: Log in to your GMC account

Boost your online sales by listing products on Sears marketplace and expand your revenue. Get millions of customers by being a part of this globally renowned marketplace and proliferate your earnings!
Why my products are showing Published in Seller panel as well in app, but still not listed on Sears marketplace ?
If the seller has provided the complete and valid information into the products then the Sears marketplace team will take minimum 24hrs to publish the products
Why My products have been unlisted from the Sears.com ?
Here is the reason behind the unlisted products of published items.
a.) If the products have not sufficient inventory ( like 0) then the Sears marketplace team remove the products from the frontend.
b.) If the products price is not competitive then marketplace (including shipping charges).
Why my all products are not listing in manage products Grid in the app ?
Please make sure that you have mapped all the products category with Sears category.
To map the categories, please follow:-
Click on Products
Select Map Category from the dropdown
Search the most relevant category
Pick one of them
Submit
When a customer places an order from Shopify Store then the inventory is reflected on Sears.com and app ?
Yes, when a customer places an order from Shopify Store then the inventory is reduced on our app and on Sears.com. We provide real-time inventory synchronization.
What is “Attribute mapping” ?
a) Attribute mapping is depends upon the categories that you have mapped.
b) In which some attribute are "required" and some are not. If the attribute is "required" then you have to map it.
c) Attribute mapping is like, in which you have to map your Shopify variant options with Sears options.
For example, Sears has given the attribute in "Clothing|Men's Apparel|Men's Big & Tall|Men's Big & Tall Shirts ". Then if you have assigned your products in the same category and you have the variations in the products then you have to map the variant attribute with sears attributes, Like Shopify color with Sears color
What is the need of “Attribute mapping” ?
With the attribute mapping, you inform to Sears team that you have created the variants on the basis of like "color". You inform to sears that you are mapping the attribute "color" with their provided attribute "color".
What is “Option Value Mapping” ?
As Attribute mapping is dependent upon the category mapping, in the same way, "Option Value Mapping" is dependent upon the "Attribute mapping". Where you inform to sears team that you have provided the options in the particular attribute.
Like you have created the variations on the basis of colors and provided three options Red, Blue, Green. Now, in this section, you have to map these options with sears options. You map red with Sears -Red, Blue with Sears-blue, and Green with Sears-green.
What is the difference between “attribute mapping” and “Option Value Mapping” Is it mandatory?
In Attribute mapping, you have created the variants on the basis of like "color". You inform to sears that you are mapping the attribute "color" with their provided attribute "color".
As Attribute mapping is dependent upon the category mapping, in the same way, "Option Value Mapping" is dependent upon the "Attribute mapping". Where you inform to sears team that you have provided the options in the particular attribute.
Yes, it is mandatory on Sears marketplace.
It is provided by the Sears Shopify attribute ———- map with——-> Sears attribute
Color———- map with——-> Sears "color".
|– Red———- map with——-> |– Red
|– Blue ———- map with——-> |– Blue
|– Green ———- map with——-> |– Green | and so on.
Can I update the products in Bulk ?
Yes, you can update the products information in bulk by CSV.
a) Go to "export/import" section.
b) Select the field that you want to update from "export CSV" section.
c) Click on export A CSV file will be imported,
kindly update into the CSV and save it into your computer system.
a) Go to "export/import" section.
b) browse the CSV file that you have updated and saved it into your system.
c) click on "import"
What is the process of making products “Publish” on Sears?
a) Go to "manage product section".
b) Select the products that you want to upload.
c) Choose "upload product" from the drop down.
d) Submit
e) Go to the " feed details" section from Products section, update it and check the item received and success as well the errors and warning.
f) Go back to "manage product section".
h) Click on "get product status".
i) Update inventory.
I have changed the image of my products on my Shopify store. How will it be reflected on your app and on Sears.com ?
If you have changed the image of your products or made any change to price, inventory, title, barcode, etc. Then all you have to do is to click on "Select & Sync Products" then a dialogue box will appear containing list of fields to be Sync with Shopify. From there you can select the fields that you want to Sync from Shopify store. Then click on Sync. After this, all the changes that are made on the Shopify store will be reflected on our app and after re-uploading the products the changes will be reflected on Sears.com.
How to check the errors and warning in products ?
> Go to the "feed details" section from Products.
> update the current sent feed by select the feed, choose "update feed status " from drop down and submit it.
> once the feed status shows "feed updated" , view it by clicking on "eye" icon.
> check the Item received, item succeeded, item failed.
> If the product(s) have any error/warning, it will be listed in the feed.
I have resolved the error and warnings. What to do the next ?
a) Reupload the products.
b) Check the feed if it is now fine.
c) Update the inventory
Why I am getting the orders for those products which I had already deleted from the store ?
When you delete the products from the store and it is published on Sears marketplace, then you have to delete the products from the sears as well to remove the listing.
How can I delete (remove) the listed products from Sears Marketplace ?
You can delete the products from the app as well from the Sears seller panel. Through App :
> Go to "Manage product Section".
> Select the products that you want to delete.
> Choose "Delete product on sears".
> Click on "submit".
I I use shipstation to pull in Sears.com orders, but since it also pulls in Shopify orders, they show up twice. How do I stop the Sears orders from going to Shopify? like to be able to see orders in shipstation from where they come from.
If you want to stop your Sears.com orders from going to Shopify store then follow these steps:
1.Go to "Setting" there you can see "Sears Orders".
2.You can set "NO" to "Set 'No' if you don't want to sync order(s) in Shopify store"
3.Then click on "Save" button on top of the page.
Now your orders will not sync to Shopify store.
My Sears orders are not fetching in your app. Why it this so ?
The Sears orders are not getting fetched on the app, this may happen because you are using any other shipping services. We recommend you to fully integrate all the services with our app and disable all other shipping services.

Willing to sell online? Don't know where to start out? Get your products on Jet marketplace, one of the fastest growing marketplaces to sell your products at an affordable cost.
I have variation type products, How can I upload variant product on Jet.com ?
In the case of Variation Product while uploading on Jet.com you need to map Jet Attribute, for Mapping Attribute, there are very simple steps
1. Go to Product Section
2. Under Product Section there is map Jet Attribute Option
3. Click on map Jet Attribute, from there you can select the attributes which you want to keep for your variant products
You can take help of given link-
https://shopify.cedcommerce.com/jet/how-to-sell-on-jet-com#sec1-6I want real time inventory synchronization, when customer place an order from shopify then inventory must be reduced on our store as well as on jet.com
Yes, we have real-time inventory synchronization. Once the customer places an order inventory is reduced from a store as well as from jet.com.
How much time jet will take to make product live on jet.com ?
It depends on the jet team. Normally they take one week if all the information from your side is correct. In case they take more than one week then you can personally contact them on support. You can also contact us. We will contact to a jet team on the behalf of client to solve the problem.
Do you provide any functionality to update price of each products ?
We provide a functionality of CUSTOM PRICING. It is a special feature through which we can raise the price of any product.
Go to admin setting. The custom pricing option is available, from there you can either select fixed amount or % age amount for products, you can also update the price of an individual product by selecting UPDATE PRICE CSV. Click on YES and then you can upload CSV and make changes.
Few of my products are not listing on jet.com and they are listed under “Excluded”. Why ?
Jet Team has some parameters and they analyze your products-
1. when they find that product pricing is competitive as compare to other market places, they exclude your products.
2. If you use some simple keywords like FREE, NEW etc to sell your products Jet team will discard your products.
3. The another condition is if you are selling some unauthorized products like drugs etc your products will be excluded.
I have archived my product still it has quantity,I am receiving orders for this product, please help ?
Once a product will be archive it can not be shown on JET. It may be possible that there is some lagging issue ( late response ) so it will take a time to archive your products.
My products are under review from many days why are they not getting live on jet ?
There are following guidelines of jet, which client has to follow while uploading products
a) Image should not be watermarked (it does not contain text)
b) The title of products should not contain words like new, genuine original, warranty, offers as well as a delivery date.
c) The product description should not contain more than 2000 words also it can not be less than 2 words.
My most of the products are showing as unauthorized,I don’t know the reason. I am unable to sell most of my premium products.
Changing JET API provider to Cedcommerce, how to switch ?
A) First of all, make sure you had disconnected from the old API integration partner. You cannot use two API integration systems simultaneously.
B) Contact us at shopify@cedcommerce.com let us know that you are switching from your API provider.
C) Jet will put your account on hold for about 2 days. JET will also put seller products to an Unauthorized state so that customer can't make any order.
D) If you add some product with the help of the previous app and it is not available on your store then we can't fetch order of that product. In this case, you must generate new SKU for that product on your Shopify store.
My products are shown on Jet.com with different description and images than what I submitted via app.
Yes, it may happen whatever information you have submitted to Jet about your products like images, description etc should be varied. Because all that should be done according to JET. They have own way to show your products.Sometimes they use another merchant’s images or description.
In this case, you can personally contact with Jet and make the request about this.Why prices on JET.com are different from what I provided ?
It is clearly mentioned in Jet terms that JET has a total control of what price will be displayed on a JET marketplace for your products. You can only specify a price on which you want to sell your products also you can use a map price and MSRP to restrict JET from manipulating prices too much. Please note that no matter what price a customer buys your product for, you will always receive an amount you specified as a product price.
Can I edit SKU value for my product ?
Jet does not allow to change the value of any SKU. If you really want to change the value of any SKU, first you must archive your product then you need to assign a new SKU to product and then again upload it on Jet. You can see your previous product with old SKU will be in archive state and the same product with new SKU will be shown as live.
Can I delete products on JET ?
Once you have submitted your products to Jet you cannot delete products from there, you can only archive them. Here it is equal to delete. If you again need them in future you can unarchive them. Well, archive and a unarchived process are little bit slow so another way is you can update the quantity of your inventory to 0. In this case, you will not get the order of that product.
I have more than 100 products only few products are imported to your app ?
We would like to inform you that we import your products on our app only when you provide valid SKU and product type to your products. Both information is the must. So it is recommended that provide an SKU and product type to your product.
Can I easily adjust product description, title, images etc. once a product is live ?
Once an item goes live, it is not easy to make updates to its content at real-time.
When you make any changes on the SKU, image or description of the product, it may change or it may not. Please remember that Jet uses a unified catalog and Jet reserves the right to choose which image/description needs to use. The process is not automatic. Only shipping weight, pricing, and qty are values that can be adjusted without any approval from Jet catalog team.
If you wish to make any changes (text, images) to already uploaded products you need to do-
1. Submit changes by exporting products to JET
2. Contact JET catalog team at partner@jet.com, provide them a list of updated SKUs and request for changes to the content of your listings. While sending this requests, try to be as specific why did you make these changes.
Please note, submitting updates usually do not take products back to under review state
My shop is FBA integrated, do you sync jet order on my FBA ?
Yes ! If you are fulfilling the order from FBA then the order will auto sync to FBA.
I want to remove a product temporarily from Jet.com and I don’t want to archive it. How should I do ?
Well, of course, you can do this. You just need to set the quantity to 0 of that product.
There are some product(s) which is not mine but shows under my product category at Jet.com ?
Jet.com manually review the products to ensure scrutiny of the highest standards. But human errors can happen anywhere. So in this case, you just need to connect with jet.com team (at partner@jet.com) and report your issue, and it will be taken care of. Moreover, our panel can be used for all the rest functionalities during this period well.
I’m trying to edit product pricing but it doesn’t change, also the order are not fulfilling. Why? Is there any problem with app ?
This can be due to rare technical glitch due to transfer of data through Jet.com APIs (Already they’ve placed an efficient API
a transfer mechanism and they’re working relentlessly to improve further). Thus, in some cases, fulfilling orders or editing
products become difficult.
However, JET team resolves the issues within 24-48 hours.
My products are listed as EXCLUDED. Why ?
There are certain categories of products that are excluded by Jet.com. If your products belong to these categories than it might be excluded.
To know about the prohibited categories, read Product Listing Guidelines.
Why does the cost is lower to pay from debit card than credit card ?
Since retailers, also, have to pay a fee for credit card transactions, the cost increases. Whereas with the Debit Cards, there is no such fee is involved. Hence it is more efficient to pay through the debit card.
What is Jet’s shipping and return policy ?
Please read Jet
Shipping and Delivery Policy, and Jet
Return Policy.Are there any restrictions on shopping at Jet.com ?
There is no such type of restrictions. However, Jet.com
reserves the right
to prohibit or limit sales to resellers or other parties whopurchase product(s)
from Jet.com
with the intention to resell those
products.
Jet.com
also reserves
the right to limit the quantity ofitems purchased per account,
credit card, shipping address, person, household or order for any
reason.
How does Jet calculate sales tax ?
Items sold by Jet are subject to the STATE TAX GUIDELINES where the destination of the products matters much. (AR, CA, CO, CT, FL, IL, KS, LA, MA, MI, MN, MO, NE, NJ, NY, NV, OH, SD, UT, VT, and WA). Any applicable tax will be applied to the price you pay for taxable items .
Does Jet offer any tax exemptions ?
Eligible governmental, non-profit, charitable and similar organizations should email all tax-exempt requests to taxexempt@jet.com. Include a copy of applicable
State or federal exemption certificates. Eligible tax exemptions will be processed by Jet and tax will not be charged on future purchases made by eligible tax-exempt.
Jet does not honor resale exemption certificates, as purchases for resale are against Jet’s Terms of Use.
I have one order on Jet but it is not synced in your app ?
Only those order can fetch in an app which is in ready state , when an order comes in ready state from created state then it will acknowledge in-app within 15 minutes and also auto sync on Shopify store. The order can not fetch in two conditions:-
1)If SKU does not exist in Shopify store
2)Products don’t have inventory
What is dynamic pricing feature? OR I am not getting my orders, what is the reason ?
We provide a special feature DYNAMIC PRICING. With the help of this feature, you can update the price of your product individually-
1) With the help this feature you can select the minimum and maximum price of your product and also a bid price. With the help of this bid price you can make changes in your product's price.
2) Make sure before enabling this feature you must disable CUSTOM PRICING feature.
3) To know the competitor price you can select product and then click on GET COMPETITOR PRICE.
The "Golden Platform" for all Craftsmen and Artisans, Etsy, facilitates easy and affordable selling of handmade and craft items. List your products on Etsy and share your creativity all over the globe.!
What are some tips when selling on “Etsy” ?
Here are some tips that will help you in gaining more profit when selling on “Etsy” :
1. It is recommendable that your products cost around $50 or less as this is the price range that attracts the most Etsy buyers.
2. Communicate with the buyers via email.
3. Show the item clearly in terms of color, size, materials, and other features.
4. Promote your business through social media marketing as it is easier and more effective.
Have a successful selling..!!
For what products “Etsy” is best famous for ?
Etsy marketplace is best known for the “Handmade & Vintage items”, “Jewellery”, “Apparel”. So if the individual is willing to sell crafts, “Etsy” is the best place for him.
What products are prohibited on Etsy ?
The following product types are restricted or prohibited on “Etsy” :
1. Alcohol, Tobacco, Drugs, Drug Paraphemalia and Medical Drugs.
2. Animal Products and Human Remains.
3. Dangerous Items: Hazardous Materials, Recalled Items and Weapons.
4. Hate Items: Items that Promote, Support or Glorify Hatred.
5. Illegal Items, Items Promoting Illegal Activity and Highly Regulated Items.
6. Internationally Regulated Items.
7. Pornography and Mature Content.
8. Violent Items: Items that Promote, Support or Glorify Violence.How can I sell on “Etsy” marketplace ?
Visit THIS LINK and click on “Register”. Complete signup process and create your shop to sell on “Etsy”.
How much time will it take to get the “Seller Panel” on Etsy ?
You will receive your “Seller Panel” right after you register on Etsy as it is an open source marketplace.
How can I connect my Shopify Store with “Etsy” ?
To connect your Shopify Store with “Etsy” marketplace you will need an integration provider which will sync your products from Shopify Store and upload them on “Etsy”. You can visit HERE then enter your Shopify Store URL and hit on “Install” button.
How to retrieve the API credentials ?
To get the API credentials you must follow these steps:
1. Sign in to your “Etsy” account.
2. Proceed with THIS link.
3. Click on “Create a New App” located at the left section of the Seller Panel as shown below:
*NOTE – You have to create a new app if you have not created an app before.
4. Enter the required details on the page and then click the “Read Terms and Create App” button.
After this the following page will appear:
5. Copy the “KEYSTRING” and “SHARED SECRET” highlighted in the previous image.
6. Copy the “KEYSTRING” and the “SHARED SECRET” values, and then paste them in the respective fields appearing on the Admin panel.
How to upload products on Etsy.com ?
To upload products on Etsy, you must go along with the following steps:
1. Click on “Manage Products” under the “Products” section of the Navigation bar of the dashboard.
2. Now check on the boxes of the products whom you want to upload on Etsy.com
3. After selecting the products, select “Upload Products” from the “bulk action” drop-down.
4. Click on “Submit” button. The product upload process is executed and the status will appear.
In any situation of dilemma, you can get complete information HERE.
How to edit my products on the Etsy integration app ?
To edit any information of any product, you must go through the following steps:
1. Click on “Manage Products” under the “Products” section of the Navigation bar of the dashboard.
2. Click on
icon in “Action” column. Before making changes in the product information, kindly disable the syncing of that particular information from the “App Settings”.
3. Make the required changes and then click the “Save” button.
If having trouble performing these steps, you can get detailed information
How to map category for my products on the Etsy integration app ?
To map category of any product, you must follow the following steps:1. Click on “Map Category” under the “Products” section of the Navigation bar of the dashboard.
2. Select the Etsy Categories under “Etsy Category Name”. Thereafter, choose all the Shopify Product Types against the category. Then comes the Shipping Template, “Who made”, “When Made” and “Recipient part”, simply choose respective options from the drop-down menu.
3. Once all the things are done, “Save” it.
In case of any trouble mapping the categories, you can get full details HERE.
Orders information on the “Dashboard” of the app is not updating ?
Click on the “Last Refresh” button next to the “Order Information” on the “Dashboard” of the app. It will automatically update the order information.
Products information on the “Dashboard” of the app is not updating ?
Click on the “Last Refresh” button next to the “Order Information” on the “Dashboard” of the app. It will automatically update the products information.
What is “Custom SKU” in the “Etsy App Settings” ?
If you have not given SKU for the variant products in your Shopify Store, then if you allow Custom SKUs by selecting “YES”, the app will generate the SKUs for those products who either don’t have or have duplicate SKUs.
What is “Inventory Threshold” in “Etsy App Settings” ?
The “Inventory Threshold” is the number you set, which will show the minimum count of an item you keep on hand. When inventory level falls below the threshold quantity, the products will become “Out-of-stock” on the marketplace.
*NOTE – Suppose you have set the threshold count to 5, then as the inventory reaches below 5, the product will become “Out-of-stock” for buyers.
What is “Auto Product Sync” in “Etsy App Settings” ?
If you enable these settings, then the selected values will be automatically synced with your store while in case of disable, automatic syncing with your store will be disabled.
What is the maximum limit of “Tags” on Etsy.com ?
You can enter a maximum number of 20 characters in “Tags” on Etsy.com without any special character used.

Uplift your online sales by listing your products on Tophatter: the most entertaining marketplace! Double the earnings with dual listing modes: auction and catalog. Get heavy traffic and consistent profits!
What is the concept of bidding in Tophatter ?
Tophatter is actually a bidding website where you can put your products for auction. The tophatter marketplace is best suited for auctioning but if you want you can even sell the products at Buy Now Price also.
Why the bid starts at $1 only ?
The $1 bid is a type of engagement for the buyers to come and view your products and if interested can move further for bidding. Your product will never be sold at this cost and you will never face any loss if you will put your product for bid.
Is it mandatory to put the products for bid ?
No it is not mandatory to put your products for bid, but the products that will perform good will eventually be scheduled for Auction, but it will never sold below cost basis. So you will not face any kind of loss.
How bidding works ?
1.Sellers specify a per-reminder bid for each product they advertise.
2.Your bid represents the amount you’re willing to pay for a reminder on your product.
3.Products with higher bids receive higher priority in Tophatter’s catalogs and search results.
4.Additionally, products that receive reminders at a fast rate receive higher priority than products that receive reminders at a slow rate.
5.We encourage you to experiment with different bid amounts to see how it impacts the number of reminders your products receive.
6.The minimum bid is 5 cents and the maximum bid is 99 cents.
7.The daily budget controls the amount of advertising a particular product receives per day.
8.The per-product daily budget minimum is $3 and the maximum is $100.What should be the size of the image which we will put for our product? How many images we can to put for the products ?
According to Tophatter the seller will have to put the size of the image as 500*500 or less than 4MB. To upload the product you will have to put minimum 2 images and if you want to get good rating of your product you can put 4-5 images.
What is the difference between Retail price, Cost basis and Buy now price ?
There are the 3 different prices set for a single product:
Retail price: It is the maximum price which you will set for your products but you will never sell the products at that price. It will be shown with the price at which you are selling the product. It is also known as Strike Through Price.
Cost Basis: It is the minimum price which you will set for your product below which you will not sell your product. If any of your product is put for auction and it did not reach your cost basis, you will not have to ship the product but if reach the cost basis price you will have to ship it.
Buy Now price: It is the price at which you will sell your product when you will not put it for auction.
How the bid moves from $1 to $10 ?
Each time someone bids, the price goes up by $1. After bidding passes $10, each bid moves the price up by $2.
How much time will it take to make my product enabled on Tophatter ?
Tophatter take about 5-7 days to review sellers account and products. After review your product will get enabled on Tophatter.
What are Catalog only Products ?
These are the products which are put on the site only at Buy Now Price. These products will never go for auction by Tophatter. These products will be sold at their normal price which will be set by the seller.
what is the difference between Days to deliver and Expedited days to deliver ?
When any buyer choose for Expedited day delivery that means that buyer wants his product to be shipped to him in next day or 1 day.
Days to deliver are the days which seller set to deliver his products which can be between 3 to 21 days.
Is there any defined length of the Title and Description of the product ?
No, there is no fixed length of the description and title of the product. You can set the title and description as you want.
How to set the bidding price ?
The bid is already set at $1 in our app, it will keep increasing as the bid increase on Tophatter.
What are the best selling categories on Tophatter ?
There are 3 best selling categories on Tophatter:
Jewellery
Apparel
Electronics
When will I get paid by Tophatter ?
You will be paid after the product will be delivered to the customer. It is compulsory to give a tracking ID to your product which will proof that the sellers are trusted one.
How much does it cost to sell ?
There is no monthly fees, you will only have to pay when your product will be sold. The average fees is 25%-35% of the sales price.
How can I become good seller on Tophatter ?
There are few ways which can make you a good seller on Tophatter:
Sell 1-2 category product: Always try to sell limited category of products on the marketplaces as there are many other sellers who would be selling the same category of products as you. So you may focus on selling few items but it should be unique and attractive. Don’t create a mess of products.
Try to put your products for auction: Bidding is a process that attracts lots of buyers, so may put your products for auction for getting more sales.
Ship quickly: Always deliver the product to the customer on the expected delivery date. Always set minimum days required for shipping. Delay in the shipment may effect your seller metrics.
What products cannot be sold on Tophatter ?
There are few products which are restricted by Tophatter to be sold:
Alcohol
Tobacco
Drugs
Firearms, Weapons
Animal skin products, etc
Why my products are unscheduled or disabled ?
Product can be disabled from Tophatter due to following reasons:
1.The product was submitted in the wrong Category.
2.The listing contained inaccurate or misleading information
3.Missing images or other required content.
4.The listing had an inaccurate or inflated retail price.
5.Seller information could not be verified.
I have 2 Seller Account of Tophatter, what to tell them ?
It is not allowed t have 2 Seller Account on Tophatter. You need to deleted one account, else both your Seller Account will be suspended. You have to manage all your products through one app and one Seller Panel, and use correct Access Token and Seller Id on app.
What is the procedure to delete the Seller Account ?
Follow the below steps to delete the account:
1.Log in to the Seller Account which you want to delete.
2.Go to Account—–>Account Info
3.Click on Cancel Account
4.Give a reason and click Cancel Account
5.Your Seller Account will be deleted successfully.Is it possible to convert Enabled for Auction products to Catalog Only Products ?
Yes, you can easily change the status of your products. To put enabled products into catalog only state, reupload the required products using the catalog only option from app and their status will change on Tophatter. To put catalog only products into auction, reupload the required products from app using upload and enable option.
If I have single image for all my products, then what should I do ?
Update images on your Shopify store and then sync it with our app.
If you don’t have extra images then upload your store logo in Settings. Keep it as the last option, because this can lower your product rating.
I want to list all my variants individually on Tophatter.
Tophatter does not allow listing variant products as Simple. If you want then create those variants as Simple products on Shopify store then upload them on Tophatter.
I don’t want to put my products for auction
If you don’t want to put products in auction, simply upload them using the upload products option. Put Cost Basis value the same as Buy Now Price value. The product will never be sold below Cost Basis (Target Price).
What is Buy One Get One Price? Is it mendatory to fill Expedited Days to deliver, Expedited Shipping Price and Buy One Get One Price ?
Buy One Get One Price is the offer price if any product have it.
No, all these fields are not mandatory to be filled.
How can I update my products in bulk using CSV ?
Using CSV Import/Export you can update your product information in bulk by exporting products from the Export CSV section and importing the CSV file after making all the required changes. You can update the following details :
1.Material
2. Retail Price
3.Expedited Shipping
4.Price
5.Expedited Days to Deliver
6.Title
CSV feature on our app is only for updating products on the app, it has nothing to do with Shopify and Tophatter Marketplace. If you want to update products on Tophatter, then after importing just upload the products. But make sure that you have disabled the syncing of the product for that particular field which you have updated by CSV or else it will be changed again.
Is it necessary to provide minimum 2 images for each product ?
Yes, it is mandatory to provide minimum 2 images. Otherwise you won’t be able to upload products on Tophatter. We also have an alternate solution for this concern, but that might affect your product rating.
How do I put products in auction ?
To place your products in auction, use the upload and enable option while uploading your products.
What is product health ?
Product health shows how your product product is performing on Tophatter. It is indicated by three colours on Tophatter:
Green- It means your product has a very good rating.
Yellow- It means your product has a moderate rating.
Red- It means your product has a poor rating.What are the factors that affect product health ?
Product health is an overall combination of the orders, product descriptions, images, price, inventory, views and other parameters decided by Tophatter marketplace. Keep your product updated to earn a better rating for your products.

Are you a new seller, looking out for marketplace selling opportunity? Start your journey with Bonanza, one of the largest open marketplaces to start your business at minimum investment, maximum revenue.
While I am trying to upload my products, getting this error : Missing profile/profile not assigned. How to fix it ?
You get this error because you are trying to upload a product to which a Profile has not been assigned.
Products with profile assigned can only be uploaded to Bonanza through the App.
In order to assign a profile, you need to create a profile and map your Shopify Products to Bonanza Category
For assigning profile-
Click on Profiling>Add new profile on the menu bar of your app account.
Now, fill the required information.
After this, click on Submit button. This will create profile for your product.
Now, re-upload product from Manage products section.
If have any issue, you can refer the video.
When I click on Item analysis then why products status on app is not changing ?
In this situation, you can contact our team.
You can write to us at apps@cedcommerce.com or directly contact us through the Live Chat facility available on your panel
You can also connect with us through Skype : live:support_35785
Why my products are in incomplete state ?
Ensure your product’s title, price, shipping, and category are properly set. Also, check that the product is having inventory or not.
What are prohibited items on Bonanza ?
There are several products which are not allowed to sell on Bonanza. You can find list of prohibited products under the following link:
https://www.bonanza.com/site_help/general_selling/prohibited_items
What to do if I don’t want to manage orders from the app ?
Go to Settings in app, select No from drop down in Order management.
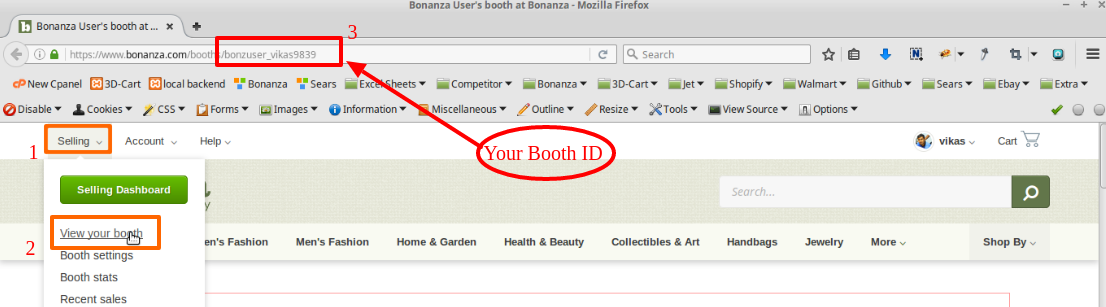
How do I get Booth ID ?
You can get your Booth ID from seller panel of Bonanza.
What is Profiling ?
Profiling is used to customize your products on the basis of price, inventory, shipping.
How to create Profiling for your products ?
You can create profile for your products using following steps:
1. Click on Profiling section in menu bar.
2. Choose Add New Profile.
3. Fill the details in the tabs:
4. General,
5. Shopify category,
6. Shipping management,
7. Inventory management,
8. Price management, and
9. Return policy management.
Click Submit.
How to upload products on Bonanza ?
For uploading products on Bonanza, follow these steps:
1. Click on Products section in menu bar.
2. Choose Manage Products.
3. Select the products that you want to upload.
4. Choose Upload Products from bulk action and click Submit.
How to delete products on Bonanza ?
For deleting products on Bonanza, follow these steps:
1. Click on Products section in menu bar.
2. Choose Manage Products.
3. Select the products that you want to upload.
4. Choose Delete Products from bulk action and click Submit.
Why products are in “Item ready to post” ?
If products are in Item ready to post state on app, just follow these steps to make them in Item for sale:
1. Click on Products section in menu bar.
2. Choose Manage Products.
3. Click Update your Booth button.
What if I am not using any of advertising level on Bonanza ?
You can continue to sell your items at Economy (3.5%). In Economy advertising level, only organic traffic is activated.
What should I do if product and order stats in Home on Bonanza app is showing wrong data ?
Click on ‘Refresh’ button in right to stats tab.
Why products on Shopify are not showing in your app ?
You must create profile first, from Add new profile under Profiling section on your Bonanza app. When you submit profile then your products on Shopify will be visible in Manage products section in app.
What are the Steps to Setting up a Booth ?
Steps to set-up your Booth Bonanza:-
1. Login to Bonanza.com
2. Click on the button to Sell on Bonanza, then click the green button to “Start Selling Now.”
3. Click the green button to “Open your Booth”.
4. Set your booth title, username, contact email and password*.
5. Connect your PayPal account to receive payment from buyers. Set your return policy, and enter your personal identification information.
6. Enter your credit card information to validate your identity and finalize setup.What are the prohibited items ?
These are the list of prohibited item on Bonanza:-
1. Bureau of Alcohol, Tobacco, and Firearms
2. Bureau of Industry and Security Denied Persons List
3. California Department of Food and Agriculture Plant Health and Pest Prevention Services Division
4. California Health and Safety Code
5. California Penal Code
6. Consumer Product Safety Commission Recalled Item List
7. Copyright Office
8. Drug Enforcement Administration
9. Federal Laws and Regulations
10. Food and Drug Administration
11. Fish and Wildlife Service
12. National Plant Board
13. National Stolen Art File
14. Office of Foreign Assets Control
15. Patent and Trademark Office
What is “Best offer” (OBO) ?
Buyers can submit an offer to sellers and they have the option to accept or deny that offer. If there is a minimum price you are willing to accept, you can set an “Instant offer price” via the item listing page or batch editor so that Bonanza automatically accepts any offers higher than the indicated price, allowing the buyer to checkout immediately without having to wait for your approval.
Why seller should choose to sell on Bonanza marketplace ?
There are some distinctive features to sell your products on Bonanza are as follows:
a. Google Integration
b. Background Burner
c. Product Sync
d. Top-Rated Support
e. Products out the Door
f. Exclusive Connections
How do I delete Items from my Booth ?
If you’d like to delete items from your booth, you have two choices:
1.If you have just a few items, you can visit your “Selling > Add or edit items” page and click the “More” link on the toolbar above the item you want to delete. Then click the “Delete Listing” link from the menu that appears (see above) .
2.If you’ve got a lot of items you want to delete at once, you can use the batch editor to do this by going to the “Selling > Batch edit items” page. You can then select multiple rows of items, select the “delete” option in the top area. Click the “Apply changes” button and all selected items will be deleted.
How do I edit an item ?
Through the following steps you can edit an Item in Bonanza:
1.You can access the edit item page by hovering your mouse over the “Selling” link in the upper left corner of any page then selecting “Add or edit items” from the drop down.
2.Once you’re on the “Add or edit items” page, simply click the “Edit” link on the tool menu that shows above each item.
3.Clicking the “Add a new Item” button will take you to a blank New Item Form, or “edit item” page, to put in your product information
What are Item Traits and how do I add Item Traits to my items ?
1.There are many ways to help buyers find your items amongst the millions of items that are available online. Item categories (“Collectibles,” “Video Games,” etc.) are a great start, but often times a category alone cannot capture all of the details that buyers will want to know when they’re searching for an item.
2.For example, say you’re searching for a necklace for your niece. You would start by browsing to the “Jewelry & Watches -> Fashion Jewelry” category, but once you were there, you would be presented with green necklaces, red necklaces, gold necklaces, platinum necklaces, etc.
3.Item traits are a way for buyers to dig deeper within a given category. So in the hypothetical scenario above, the buyer might create a search filter so they see only items with a ruby gemstone and a silver band.
Fees to Bonanza Marketplace
1. Free setup and listing
2. Low transaction fees
3. Free advertising until your item sells
How my products get LIVE on Bonanza ?
To get your products live on Bonanza, following points are important to complete:
1. Seller has to complete Profiling.
2. The Booth must be activated.
3. All the compulsory informations must be entered, like: Product Type, Title(not more than 80 characters), Product Image, Product Category, Barcode, Item Traits and Condition.
What are the steps to upload products on Bonanza ?
Before uploading your products on Bonanza, you have to first import your products. There are three ways seller can import product:
1.All Products: This will import all your products from shopify store.
2.Published Products: Selecting this option will import your products which are published on Shopify.
3.Filter Products to import: Seller can select the products manually and import them on App.
After importing your products on App, follow the below Steps to upload your product:
1.Click on “Product” in menu on top.
2.Select “Not Uploaded” in “Status”.
3.Select All products you want to upload.
4.Then Select “Upload Products” in place of “Bulk Upload” and Click “Submit”.
How to delete Product from Bonanza App ?
To delete a product follow the Steps:
Step 1: Click “Manage Products” under “Product”in the menu, at the top of the dashboard.
Step 2: Select the products you want to delete.
Step 3: then Select “Delete Products” from “Bulk Upload” and press Submit.
What is Profiling ? And How to create a Profile ?
Profiling Means, rather than making the changes in the common attributes of each and every product, admin can create a profile and assign it to all the products having common attributes, and thus make the changes in the meta-keys available on the profile page.
While creating and editing the profile, admin can select the product and the corresponding attributes. These attributes are applicable to all the products that are assigned to the profile.
How to create a Profile ?
You can create Profile, by following the below Step:
Step 1: Click on “Add new Profile” under “Profiling” in Menu on top of the dashboard.
Complete all the required field to create Profile for the Products.
Shipping Management (Domestic and international shipping)
Domestic and International Shipping can be managed under Shipping Management.
Domestic Shipping allows a seller to sell his products within the country where a seller can also sell his products internationally by selecting “Yes” in Enable International Shipping.
Both Shipping type can be managed in Shipping Management by going through following steps:
1.Click on “View Profile” under “Profiling” in the menu on the top of the dashboard.
2.Click on “Edit Button(pencil)” under Action.
3.Click on “Shipping Management” from there you can select Domestic and International Shipping and make changes.
What is Inventory Management ?
Through Inventory management Seller can manage to apply Inventory rules:
Fixed Inventory: You can fix the inventory of Products.
Custom Inventory: You Can Put a Minimum or Maximum Threshold Value.
What is Price Management ?
Through Price, management Seller can perform custom pricing, which means he can publish products on Bonanza with different price as on Shopify. It can be done in two ways, i.e. Fixed and Percentage.
What is Return Policy Management ?
Return Policy Management has options to manage the setting for the return orders.
Through these setting, you can manage days and shipping cost of return order.
How can I boost my sales (Tips to increase sale ) ?
There are some basic factors to increase your sales on Bonanza are:
Item Title, Product images, Item Category, Condition and traits, Item barcode(UPC/ISBN etc.).
Why am I unable to upload products on Bonanza ?
Your products are not able to upload on Bonanza because there must be missing Title(more than 80 words), Inventory, Product Type, Category. You in this case you have to complete the Profiling for your products.
How can I check my Order Status ?
To check the information about orders, Click on “Order” in Menu on top of the Dashboard.
What is the Onboarding Process of Bonanza App ?
There are four steps to complete the onboarding process of Bonanza Marketplace Integration App.
1.Registration.
2.API Authentication.
3.Import Products.
4.Item Analysis.What is API Authentication ?
In API Authentication you have to Enter your Booth ID to complete API Authentication.
What are Simple products and Variant Products ?
Simple Products:- Simple products are those which don’t have any Variant.
Variant Products:-Variants are the products with different attributes i.e. size, color and material.
I only want to manage order and don’t want to manage products with App, is it possible ? How ?
Yes, you can manage order from the app without managing the products, you have Disable- Auto Product Sync in “Settings”.
What is Threshold Limit ?
Threshold Limit is the quantity, when the inventory matches with the threshold value, the seller will not get orders for the same product.
Why some of my products are not uploaded on Bonanza ?
Products will not get uploaded for the following reason:
1.Duplicate Title.
2.Title with more than 80 characters.
3.Booth not Active.
Why titles of my products not listing completely on Bonanza ?
According to Bonanza rules Title of any product, must not exceed 80 characters.
Or the title with more than 80 characters will be displayed up to the limit.
Why I am unable to LOGIN Bonanza panel ?
Check for the Login credentials or your account may be suspended by Bonanza because of some reason. In this case you have to contact Bonanza.
What are Metafields & How do I add Metafields ?
Metafields: Metafields are useful for storing specialized information, such as part numbers, customer titles, or blog post summaries. They can be used by apps and channels to track data for internal use.
How do I check whether my Booth is live or not ?
To check whether your Booth is live or not, Follow the steps:
1.Click on “Products” in Menu on top of your dashboard.
2.Select and click on “Manage Products”.
3.
Click on three Horizontal Lines, on the right side of “Bulk Upload”.1.Click on “Update Booth”.
2.Then check for the Message if it says that “Booth queued for update” then your Booth is live or it will say that “Booth is not activated”.
How does Bonanza App work ?
Through Bonanza App, your shopify store will be synced with Bonanza Seller Panel. Seller can manage products from shopify to seller panel and also with App. You can also manage products from app, as when you will receive an order on Bonanza, the app will create the same order on shopify store and as soon as you will ship the order from shopify store, the app will ship the order from bonanza seller panel.
Why some of my products are in Incomplete State ?
You have uploaded the item without giving it a title, price, category or 0 inventory.
Complete Profiling to upload your products.
What are these product states in Bonanza ?
There are 5 states of Product in Bonanza:-
1.Items For Sale: These items are for sale.
2.Items Ready to Post: These items are not for sale but ready to be posted on Bonanza(You just have to “Update Booth”).
3.Product Submitted: Products are uploaded but are “Under Review” by Bonanza.
4.Profile Not Set: You have to Update or Add new profile to the products according to your Shopify Store.
5.Not Uploaded Products: Products which are not uploaded on Bonanza.

Are you selling tech products? Give a new platform to your catalog and increase your sales. List your products on Newegg Marketplace and improve the visibility of your products before prospective audience.
Why all the products are not showing on app ?
It is essential to provide sku and & product type to your products only then you would be able to import that product on app. Apart from this you need to perform category mapping for your products. When you have done with category mapping, you can see all products in app.
Can I use ASIN to sell my products on Newegg Marketplace ?
You can’t use ASIN to sell your products on Newegg. Newegg allows MPN and Barcode to sell your products.
What are the necessary information to upload my products on Newegg ?
Your products must have title, description, price, image, an unique identifier (barcode or mpn), weight and manufacturer. If your products have all these information, they would be uploaded on Newegg.
What are the basic information which I need to provide Newegg to sell on Newegg.ca or Newegg.com ?
There are 3 requirements that Newegg Marketplace asked you to sell on Newegg.ca-
1.Canada Business Identity.
2.Insurance for your Products
3.Account Information must be valid.
There are also 3 requirements that Newegg Marketplace asked you to sell on Newegg.com-
1.W9 form
2.Insurance for your Products
3.Account Information must be valid.
What products can I sell on Newegg.ca Marketplace ?
All available product categories are listed on the seller commission page. Currently, all products selling on www.newegg.ca must be listed with price in Canadian Dollar. If you would like to request a specific category not listed above please email marketplace@newegg.ca.
Are there any restrictions on what I can or cannot sell on Newegg.ca Marketplace ?
You can visit complete content policy here.
How to copy your items from Newegg.com (US) to Newegg.ca (Canada) ?
If you have already listed your products through Newegg Marketplace, you can list the same product listings to www.newegg.ca by following the steps here.
Why my orders are not showing in sales order section ?
Be assure that you have sku and inventory for any particular order because we fetch only those orders on app whose skus are available in app. If you don’t have that sku in your shopify store then you can create that sku in your shopify store and then we will sync it to our store and your order would be fetched.

Want to diversify your eCommerce venture in Canada? Get hold of Canadian audience to sell your products to. What are you waiting for? Get Started Today with Walmart Canada!
How do I join the Walmart Canada Marketplace ?
To join the Walmart Canada Marketplace, you need to contact the “Walmart Canada Marketplace Team” at mkplslcomm@walmart.com.
How much time will it take to make product publish on Walmart.ca ?
When you have uploaded the products, the feed will be generated. If all the information you provided is correct from your side then normally it takes approximately 20 minutes to process the feed.
Requirements and how to upload product on Walmart.ca ?
To upload your products on Walmart.ca, you just need to follow the below steps:
1. Category Mapping : You need to map categories of all the product types as if the Category is not Mapped, the Product will not be displayed on the app.
2. Attribute Mapping : In case of product variants, it is mandatory to map the “Attributes”.
3. Barcode : Make sure that your product have a barcode. Add barcodes to your product if the products do not have a barcode. You can add barcode from shopify store and then sync it to app, or add the barcode to individual product from edit product option.
4. Tax Codes : All the product must have valid taxcode. If your products do not have the taxcode then you can add taxcode from the “Edit” option of individual product.
5. Select Product and Upload : Select the product that you want to publish or upload on Walmart.ca. Then select “Upload Product” from the drop down list then click on “SUBMIT” button. After your products Successfully Submitted to Walmart proceed to next step.
6. Walmart Feed Update : Click on “Products” from the menu, then click on “Walmart Feeds”. Update the recent feed that you had send to the Walmart.ca. After Updating the feed status you will be able to know whether your feed has been received, processed or in-process on Walmart’s end.
7. Product Status: Once your feed status is “Processed”, you will be able to see the number of products that are successfully uploaded or published on Walmart.ca. Go to “Manage Product”, click on “Get Product Status” this will change your product status from “Not Uploaded” to “Published” if the product has been uploaded on Walmart.
What are the Products ID’s (Product Identifiers) that are accepted by the Walmart.ca ?
Walmart.ca accepts following Product Identifiers:
1.GTIN (14 digits)
2.UPC (12 digits)
3.EAN (13 digits)
4.ISBN (10 or 13 digits)
5.ISSN (8 digits)
How to retrieve Walmart Canada API credentials ?
To retrieve “Walmart Canada” API credentials you must go through the following steps:
1. Open the “Walmart Canada Seller Account”.
2. Click on the “Settings” icon.
3. Under the “Settings” icon, click on “Consumer IDs & Private Keys”.
4. When the page redirects, click on “Copy” button under the “Consumer ID” section and click on “Regenerate Key” button under the “Private Key” section.
5. Paste these credentials in step-2 i.e; API Configuration of the app.
How to map category for my products on the Walmart Canada integration app ?
To map category of any product, you must follow the following steps:
1. Click on “Map Category” under the “Products” section of the Navigation bar of the dashboard.
2. Select the Category Under “Walmart Category Name“.
3. After that select a Sub-category.
4. Then comes the Column for “Walmart TAX CODE”, set the tax code of your product.
5. Under the “Product Type (Shopify)” column, put the cursor inside the text field, all your unmapped Product Types will get listed. Select the Product Type that you want to Map.
6. Click on “SUBMIT” button.
How to edit my products on the Walmart Canada integration app ?
To edit any information of any product, you must go through the following steps:
1. Click on “Manage Products” under the “Products” section of the Navigation bar of the dashboard.
2. Click on
3. Make the required changes and then click the “Save” button.
How to map category for my products on the Walmart Canada integration app ?
To map category of any product, you must follow the following steps:
1. Click on “Map Category” under the “Products” section of the Navigation bar of the dashboard.
2. Select the Category Under “Walmart Category Name“.
3. After that select a Sub-category.
4. Then comes the Column for “Walmart TAX CODE”, set the tax code of your product.
5. Under the “Product Type (Shopify)” column, put the cursor inside the text field, all your unmapped Product Types will get listed. Select the Product Type that you want to Map.
6. Click on “SUBMIT” button.
My products status is “Item Processing” from many days, how much time will take to Publish the products on Walmart ?
Walmart takes approx 15 to 20 minutes to process product feed. The products under “Item Processing” means your product feed is successfully submitted to Walmart. All you need to do is to update the product status by clicking on “Get Product Status” in the Manage Products section.
How can I disable the free shipping from my products on Walmart.ca ?
If you want to disable or remove free shipping from your products then to Settings. Under the “Product Setting”, you’ll see an option “Remove Free Shipping From all Products”. Set this field to YES and the free shipping will be disabled.
What is “Threshold Product Inventory” in “Walmart Canada App Settings” ?
The “Threshold Product Inventory” is the number you set, which will show the minimum count of an item you keep on hand. When inventory level falls below the threshold quantity, the products will become “Out-of-stock” on the marketplace.
*NOTE – Suppose you have set the threshold count to 3, then as the inventory reaches below 3, the product will become “Out-of-stock” for buyers.
Products information on the “Dashboard” of the app is not updating ?
Click on the “Last Refresh” button next to the “Order Information” on the “Dashboard” of the app. It will automatically update the products information.
Orders information on the “Dashboard” of the app is not updating ?
Click on the “Last Refresh” button next to the “Order Information” on the “Dashboard” of the app. It will automatically update the products information.

Break the bars! Get hold of the Fruugo marketplace to the fullest by selling your products in 32 different countries and extend your reach to the global customers.
How do I map products to fruugo categories ?
1.Go to the ‘Map Category’ option under the products section.
2.You can map the category of product types to fruugo categories.
How do I upload products on fruugo marketplace ?
Once you have completed mapping your product types to categories, go to the ‘Manage Products’ page and select those products. Now from the ‘bulk action’ button that appears, select the upload products option.
Why are some of my products not visible even after I have imported all of them successfully from my store ?
This is because you have not mapped the categories for those products.
Can I stop receiving fruugo orders on my Shopify store ?
Yes, go to the setting section and there in the Fruugo Order section set the order syncing to ‘No’.
Can I increase or decrease the price of all products simultaneously ?
Yes, you can done this from the Fruugo configurtaion through ‘Product Setting’ section.
What is “Threshold Product Inventory” ?
It denotes the number of quantity of the product that should be present so that the product status on fruugo marketplace is ‘in stock’. If the stock decreases on the marketplace and the number of pieces available goes below the threshold number you have set, our app will tell fruugo to set the product status as ‘out of stock’.
Can I provide discounts on my products ?
Yes, from the configurations page you can do it. You can also set discounts for a particular period using the discount start and end date options. You can also add the Value Added Tax rate for your product if needed.
How can I search for a particular product ?
Simply go to the ‘Manage Products’ page and use the ‘filter products’ option. There you can search for your product using sku, product id, and more.
How do I delete a product from Marketplace ?
You can do it using the "Remove products" option under "bulk action", for any or all of your products by selecting them according to your need.
How can I make updates to various fields of the product from the app ?
Go to the "Product Update" option under the Export/Import section, select all or desired fields that you wish to change, click "Export" and you will get a CSV file containing the products. Save your changes on this csv file and then click "Import" to get this newly updated CSV file back in our app. The changes will be reflected. However, you need to stop the syncing first from our app to your store if you wish to make changes from our app.

Are you going to start selling online? Go ahead with Wish.com, an open marketplace for those sellers who are going to start their selling journey. You don’t need to pay until you get any sales. So what are you waiting for, start listing your products now.
How would I get seller panel from Wish ?
Wish is an open marketplace, you can get seller panel in few minutes. Open your account here. Just submit few necessary details about your business and open your account.
Do I need any catalog or revenue requirement to get seller panel from Wish ?
You don’t need to fulfill any special criteria for revenue or catalog to get seller panel from Newegg.
What are the necessary parameters to submit products on Wish ?
Your products must have tags, title, description, images, price, inventory etc. As Wish don’t have any process like category mapping, so tags are required to know about your product’s category.
How can I submit variant products in Wish ?
If you are selling variant products, your products must have either color or size. You can’t submit your variant products without them.
I am selling the products of different manufacturers, am I allow to sell on Wish? What is Product Counterfeit Policy of Wish ?
Yes, you are allow to sell your products on Wish. Wish is very strict to protect some manufacturer or brand by illegal use. If you are selling products of some other seller, you need to submit a reselling authorization certificate in which it should be clearly mention that you are allow to sell the products of that manufacturer.

'Rock n Roll' the Success.!! Start up your journey with 'Reverb', the world's largest marketplace for new, used, vintage and handmade music gear.!
Are there any listing charges on Reverb?There is no listing fees on Reverb. No charges will be applicable for simply listing a product on reverb.com. However, there is a 3.5% selling fee for every item sold on Reverb.
What is the Payment Processing Fee on reverb.com?There is a Payment Processing Fee on reverb.com which applies over the transactions. For any other seller that is using Reverb Payments, the fee is 2.7% + $0.25 per transaction
For a Reverb Preferred Seller, the fee is 2.5% + $0.25 per transaction.How many photos can I use in a listing on reverb.com?Each listing on reverb.com is can have a maximum of 25 photos with it out of which the first image will be set as the “Main Image”.
What products I can’t sell on reverb.com?There is a Prohibited Policy on reverb.com under which you shall not sell a hard-drive, USB drive, USB stick, portable disk or any other similar format of digital data storage that contains preloaded sounds, recordings or other media on the Site.
You can check out for the examples of Prohibited Item on Reverb over HERE.How much time will it take to get an account on Reverb?Reverb is an open marketplace, therefore you don’t have to wait for an approval. You’ll receive your Reverb Seller Account right after you’re done with the ‘Registration’.
Can I connect my Shopify Store with “Reverb” ?Yes.! To connect your Shopify Store with “Reverb” marketplace you will need an integration provider which will sync your products from Shopify Store and send the data on “Reverb”.
How to upload products on reverb.com through integration app?To upload products on Reverb, you must go along with the following steps:
1. Click on “Products” present on the Left Options on the Dashboard.
2. Now check on the boxes of the products whom you want to upload on reverb.com
3. After selecting the products, select “Publish Listing” from the “bulk action” drop-down.
4. Click on “Action” button. The product upload process is executed and the status will appear.Why the Products and Order information on the “Dashboard” of the app is not updating ?Click on the “Last Refresh” button next to the “Order Information” on the “Dashboard” of the app. It will automatically update the products information.
What is Profiling?Profiling is the collection, where you apply some conditions related to the products. All those products that fall under the specific profile will share the same rules such as category details, shipping details etc. on the Reverb Marketplace.
What do “Threshold” means inside the app?Threshold is the value with which when the inventory matches with the threshold value, the product will get out-of-stock over the marketplace.

Willing to sell on Australia's Top Marketplace? Get your products on Catch, where an item is sold every 2.8 seconds.
Are there any listing charges on Catch.com.au?The commission varies by category from 10 – 25% and that comes on top of a monthly seller subscription of AUS $49.99. Payments are disbursed every 14 days in Aussie dollars.
Why are my products uploaded showing error?Please click on the error button to view the error details. It is required that the product you are having must have a unique identifier value and should have bar-codes assigned to them as it is required to sell on the Catch Marketplace.
How many photos can I use in a listing on Catch.com.au?You can submit upto 6 images.
The first main image must be a clean product photo showing the full product with a plain background. Supporting images may be:
• Professional standard lifestyle images showing the product in use.
• Contain information/specifications important to the product, such as a visual of dimensions.
• Multiple views of the productRecommended: 1000 x 1000px
Maximum Width: 1320px
Maximum Height:1080px
Resolution: 72dpiAcceptable :
• Clean image with a plain background for the first image
• Professional lifestyle images (not as the main image)
• Graphics to support image, such as showing product dimensions (not as the main image)Not Acceptable :
• Watermarks, logos, badges, and stamps
• Irrelevant photos that don’t show the product
• Commercial info such as pricing, seller info, postage, etc.What products I can’t sell on Catch.com.au?There are both Restricted and Prohibited Items on Catch Marketplace. You can check the complete list of such items over here –
https://catchmarketplace.zendesk.com/hc/en-us/articles/360001117216-Prohibited-or-Restricted-Items
How much time will it take to get an account on Catch Marketplace?Catch is a curated marketplace. Once you submit the information on the Registration Page the Catch Team, after reviewing the information, will contact you directly and provide you the account. There is no fixed time and it depends on the Catch Approval Process.
Can I connect my Shopify Store with “Catch Marketplace”?Yes, you can connect your Shopify Store with “Catch Marketplace” using the Catch Marketplace Integration by CedCommerce.
How to upload products on catch.au.com through the Catch integration app?To upload products on Catch Marketplace, you must go along with the following steps:
1. Click on “Products” present on the Left Options on the Dashboard.
2. Now check on the boxes of the products whom you want to upload on Reverb.com.
3. After selecting the products, select “Publish Listing” from the “bulk action” drop-down.
4. Click on the “Action” button. The product upload process is executed and the status will appear.Once you have submitted the product please follow the below instructions to submit the price and inventory.
1. Click on Products and then onto the Item Processing Products
2. Select the products
3. After selecting the products, select “Price/Inventory Update” from the “bulk action drop-downOnce done, move to the Feed Process Section and Select and Update Status of the Recently Submitted Feed.
After that Click on the Product Section and click on Sync from Catch Button to update the status of the product present in the App.
Why the Products and Order information on the “Dashboard” of the app is not updating?After Uploading the Products or After Getting the New Orders you can click on the refresh button to update the statistics on the Dashboard.
What is Profiling?Profiling is grouping your Shopify Products and assigning them to a Common Catch Category and setting price and Inventory rules. All those products that fall under the specific profile will share the same rules such as category details and logistic class on the Catch Marketplace.
What does “Threshold” mean inside the app?The “threshold” is a condition in the App inside the Inventory Template where you can define the minimum inventory which you want to send to the Catch Marketplace for the products.
You can set the minimum threshold below which the inventory will be sent to the Catch marketplace as 0. The threshold is a condition in the App inside the Inventory Template where you can define the minimum and the maximum inventory which you want to send to Catch Marketplace for the products.

Want to expand your business to a wider audience base? Shift your focus to Facebook Marketplace and Instagram Shopping and experience seamless selling experience. We have listed some of the significant queries with solutions to help you sell on Facebook and Instagram. Find out!
What are the requirements to sell on Facebook Marketplace and Instagram?To sell on Facebook Marketplace and Instagram, you must adhere to the following conditions-
1. You must have your business registered in the U.S.
2. A federal tax identification number that matches your legal name.
3. A state tax registration number for every state where you do business.
4. You must have a U.S. bank account.
5. Your physical business address and email address.
6. You can only ship your products to U.S citizens.
How can you get checkout on Facebook and Instagram?Checkout on Facebook and Instagram let your buyers make a purchase directly without having to leave the app. You can access to checkout on Facebook and Instagram through Commerce Manager if you meet all the prerequisites for the same.
Currently, checkout on Facebook and Instagram is available for US shoppers and is rolling out to more merchants.
What is a product catalogue, and how can you connect your catalogue to Facebook Marketplace and Instagram?Product Catalogue is a set of information about your products. It includes details about your product, name, size, attributes, etc.
You can upload a product catalogue to Facebook Marketplace and Instagram in two ways-
1. Catalogue Manager: You can create a new catalogue through Catalogue Manager or connect your existing one with the Facebook Marketplace and Instagram.
2. Facebook Listing Partner: You can set-up your Shops on Facebook through Facebook’s Listing partners and link your page catalogue with Facebook Marketplace and Instagram ShoppingWhat is the Shipping policy accepted by Facebook and Instagram?As a seller on Facebook, you need to ship your products within three working days and ensure that the product reaches the customers not exceeding seven days. Also, use delivery services that offer tracking and delivery confirmation for your customers.
How can merchants communicate with their clients on Facebook Marketplace and Instagram?You can communicate with your customers via email. As soon as a merchant start selling on Instagram or Facebook Marketplace, they need to have following transactional order emails-
1. Order Confirmation email
2. Shipping Confirmation
3. Delivery Confirmation
4. Order Cancellation
5. Return Completion Confirmation
Also, in case of any query, a customer can reach out to the seller via customer service contact email address that is provided in the Commerce Manager.

Here are some of the top queries that must have arisen in your mind while thinking of Instagram. Check it out.
Are you eligible for Instagram Shopping?If you answer “Yes” to all the following conditions, you will be completely eligible for Instagram Shopping:
1. Is your business located in a supported market?
2. Does your business sell physical goods?l
3. Does it comply with our commerce policies?l
4. Is your Instagram account a business account?
5. Is your account connected to a Facebook Page?
How to connect your Product catalog to Instagram?You can connect your Instagram business profile to a Facebook catalogue. You can do so by two methods:
1. Use Catalogue Manager: You can create yourself a new catalogue, or connect to an existing one.
2. Use a Facebook Partner: You can set-up your Shop through Facebook Partner
How can you get the checkout on Instagram?Checkout on Instagram let you offer a secure and in-app checkout through which buyers can directly make the purchases. Currently, checkout on Instagram is available for US shoppers and is rolling out to more merchants.
How do you set-up your shop details?To leverage the checkout on Instagram, you need to configure the Commerce Manager. The Commerce Manager helps you set-up your shipping, returns and payments policies for your shop.
How can you access checkout on Instagram?Checkout on Instagram is only available for mobile devices. As of now, it is just supported on Instagram App and not on the desktop.
 Can I change my HubSpot account at any time?
Yes, you can easily change your HubSpot account in One click.
What type of data gets synced from Shopify store to HubSpot ?Data related with Line items, Products, Orders, Customer, and Abandoned Checkouts are synced from Shopify store to HubSpot.
Is the integration compatible & works with HubSpot free account?Yes, the integration is compatible with the free HubSpot account.
Can data be synced bi-directionally? from HubSpot to Shopify & Shopify to HubSpot?The integration works with one-way sync i.e. Shopify to HubSpot.
Is it safe to sync all my Shopify Data to my HubSpot account through the app ?Absolutely, but never share your credentials with others.
In which HubSpot pipeline and stages, order are synced in HubSpot?Order will be synced in the eCommerce Pipeline with stages, Checkout Abandoned, Checkout Pending, Processed, Shipped, Cancelled, Checkout Completed.
Does the integration sync multiple Shopify store data to HubSpot?If you have a number of Shopify Stores, you can connect your single HubSpot account with all of your Shopify stores although you have to install our Integration in each Shopify Store.
Does the integration create any predefined Contact lists in HubSpot?Yes, Predefined contact can be listed into HubSpot by segmenting your costumes based on the shopify data.